The Superior Works: Patrick's Blood and Gore Planes #39 - #44
Quick Find: #39, #40, #40 1/2, #41, #42, #43, #44
Now that the "boring" bench planes have been
enumerated (there's
more, but they're later in the numbering sequence), it's
time to look at some
of the more interesting specialty planes.
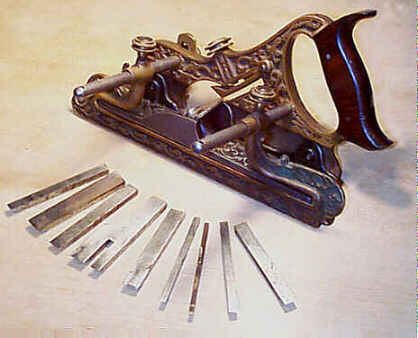
#39 Dado plane, 8"L, various widths (see below), 1 3/4lbs-2 1/4lbs, 1902-1952.
These planes, 8 all together, are designed to cut a dado, a trench across the wood's grain, and are the metallic versions of the earlier wooden ones. Like the wooden dado planes, a wooden batten must be laid aside the dado's position to guide the plane. An adjustable depth stop regulates how deep into the wood's surface the plane will cut. These planes can be used left or right handed, just like the wooden ones, an example of which is illustrated immediately below.
All the planes have their blades set at a skew, with
two adjustable spurs
forward of the blade to score the wood (across the dado's
width) before the
blade makes its cut. The skewed iron facilitates cutting
across the grain by yielding
more of a slicing cut than there otherwise is were the blade
not skewed; the
compression of one fiber against another is minimized with a
skewed iron where
the compression is spread out over several fibers in the
path of the iron
whereas with a non-skewed iron the compression is placed on
a single fiber in
the path of the iron. But, more on the dado cutting action
later.
 I don't like these
planes
at all, not because they're metallic planes, but because
they are difficult to
put any bearing pressure on their toes. There simply isn't a
nice surface for
your forward hand. Instead, the metal depth adjustment
screw, as well as the
tops of the spurs, stick up from the top of the plane, which
physically hurts
your hand as the plane is used. This isn't that much of a
hindrance when the
planes are used on softer woods, but they're downright
bloody when using them
on hardwoods. They also have the disadvantage of being more
expensive than the
wooden ones, but their soles don't warp like the wooden ones
can. Regardless
whether you prefer the metal or wooden dado planes, they
both cut fabulous
dados, and amaze dado'ers of the 'lectrical persuasion with
their simplicity
and results. The swell thing about dado planes in general is
that you can taunt
normites by asking them how they would cut a dado 45 degrees
from the edge of
the stock using their beloved stack dado cutter, and then
watch them go through
the dog and pony show of rigging up some fancy jig to try
and pull it off. With
these planes, you can bury them in the shavings that'll pile
up by the time
they make their first cut.
I don't like these
planes
at all, not because they're metallic planes, but because
they are difficult to
put any bearing pressure on their toes. There simply isn't a
nice surface for
your forward hand. Instead, the metal depth adjustment
screw, as well as the
tops of the spurs, stick up from the top of the plane, which
physically hurts
your hand as the plane is used. This isn't that much of a
hindrance when the
planes are used on softer woods, but they're downright
bloody when using them
on hardwoods. They also have the disadvantage of being more
expensive than the
wooden ones, but their soles don't warp like the wooden ones
can. Regardless
whether you prefer the metal or wooden dado planes, they
both cut fabulous
dados, and amaze dado'ers of the 'lectrical persuasion with
their simplicity
and results. The swell thing about dado planes in general is
that you can taunt
normites by asking them how they would cut a dado 45 degrees
from the edge of
the stock using their beloved stack dado cutter, and then
watch them go through
the dog and pony show of rigging up some fancy jig to try
and pull it off. With
these planes, you can bury them in the shavings that'll pile
up by the time
they make their first cut.
The planes came in the following widths (not all
planes were available during
each year of production) - 1/4", 3/8", 1/2", 5/8",
3/4", 13/16", 7/8", and 1". The earliest models don't have
their number and size embossed on their left side, but,
instead, have them both
cast into separate ovals on the right side, which is
machined flat, with the
backgrounds around the number and size being japanned. On
these models, the
number (cast as "NUMBER 39" forward of the handle) and size
(cast
near the toe) are embossed in separate shallow depressions,
which probably
proved difficult to cast with any regularity. The number and
size were soon
relocated to the left of the plane. The patent date is cast
into the handle on
the first and subsequent models, but was later replaced with
just
"STANLEY" cast into the handle starting around the
sweetheart era
(ca. 1920).
 All of the planes have
their size cast on them, except for one, the 13/16" model.
This is because
this plane was made from a 7/8" size, which was then ground
narrower to
13/16". The 7/8" marking was ground off the plane before it
was
japanned, but the "No. 39" remained on the casting. This is
one of
the rarest Stanley planes (think about it, how many
applications do you know
where a 13/16" dado is used?). Because of its rarity, some
clever latter
day toolmakers have attempted their hand at making the
product, so be very
careful of those that have been re-ground recently. There
should be a circular
mark where the 7/8" mark was ground off, if it is an
original 13/16".
However, the good faker can make this mark, too. Check the
japanning in the
area of the removed mark to verify its authenticity. Caveat
emptor on this one!
All of the planes have
their size cast on them, except for one, the 13/16" model.
This is because
this plane was made from a 7/8" size, which was then ground
narrower to
13/16". The 7/8" marking was ground off the plane before it
was
japanned, but the "No. 39" remained on the casting. This is
one of
the rarest Stanley planes (think about it, how many
applications do you know
where a 13/16" dado is used?). Because of its rarity, some
clever latter
day toolmakers have attempted their hand at making the
product, so be very
careful of those that have been re-ground recently. There
should be a circular
mark where the 7/8" mark was ground off, if it is an
original 13/16".
However, the good faker can make this mark, too. Check the
japanning in the
area of the removed mark to verify its authenticity. Caveat
emptor on this one!
These planes, while overall ruggedly built, can often
be found with broken
parts. Of those that are damaged, it's usually a broken or
missing spur or the
lever cap snapped off below its pivot point. The lower edge
of the lever cap
can chip, but how that happens is beyond me, unless the dude
was planing
granite or something like that. Check that the depth stop
isn't broken down
where the stop's adjusting screw threads into it - they can
break out around
there. These are obvious problems that stick out like a sore
thumb.
 The planes are often
found missing their cutters. Finding replacements for them
is tough since the
cutters are unique to the series. They have bevelled edges
and flare out on
their right edges. The spurs are held to each side of the
plane with two screws
each; one screw, the lower one, is countersunk so that it
sits flush with the
spur, while the upper larger screw sits above the spur.
Missing spur screws is
a common problem with these planes. Most of the spurs are
unique to the size of
plane for which they were designed, so salvaging them can be
a problem.
However, the rightmost spur, since it's flat, unlike the
leftmost ones that are
bent to each size plane, can be pilfered from other planes
as all the planes of
the series are machined flat on their right
sides. The most common
damage to the spurs, other than their being used up, is a
crack about the lower
screw, near the business end of the spur. One other thing to
be watchful for,
as any dealer or collector of these planes knows all too
well, is that the
spurs are not interchangable between the earlier and later
types; the earlier
ones are narrower than the later ones, and the slots that
they fit into are
sized accordingly.
The planes are often
found missing their cutters. Finding replacements for them
is tough since the
cutters are unique to the series. They have bevelled edges
and flare out on
their right edges. The spurs are held to each side of the
plane with two screws
each; one screw, the lower one, is countersunk so that it
sits flush with the
spur, while the upper larger screw sits above the spur.
Missing spur screws is
a common problem with these planes. Most of the spurs are
unique to the size of
plane for which they were designed, so salvaging them can be
a problem.
However, the rightmost spur, since it's flat, unlike the
leftmost ones that are
bent to each size plane, can be pilfered from other planes
as all the planes of
the series are machined flat on their right
sides. The most common
damage to the spurs, other than their being used up, is a
crack about the lower
screw, near the business end of the spur. One other thing to
be watchful for,
as any dealer or collector of these planes knows all too
well, is that the
spurs are not interchangable between the earlier and later
types; the earlier
ones are narrower than the later ones, and the slots that
they fit into are
sized accordingly.
If handcut dados are in your future, you may want to
consider getting the #46 since its
purchase price is considerably less than buying the series
of the #39s.
Plus, the #46 is more versatile as it can
plough, rabbet, and
match. However, if you know you're only going to work 3/4"
stock, for
example, then buying the #39 3/4
is more economical than buying a complete #46.
For any dado plane, wooden or metallic, to work
correctly, the nickers need
to be set just a hair deeper than the cutter. The nickers
need to score the
wood fibers prior to the cutter lifting the shaving. The
edges of the cutter
must be aligned with the line scored by the nickers
otherwise ratty shoulders
result. If the plane binds during use, a misalignment
between the nickers and
cutter may be the reason. It also may be from an improperly
ground cutter,
where the edges themselves flare out just a hair causing
them to drag along the
shoulders. These edges do not need to be beveled back so
that the width of the
bevel face of the cutter is narrower than the face's. This
is a common
misconception, and the plane will work fine if the widths of
both faces are the
same. When the cutter and spurs are set just right, you can
peel off crossgrain
shavings of a length equal to the length of the dado and
leave the adoring
public speechless over a feat thought impossible by the
paint by number
woodworkers out there.
And for those who are into the great mysteries of
life, like what's the
opposite of bread, one can contemplate forever over how
Stanley got the depth
stops on these planes. It's sorta like Stanley's version of
the Rubic's Cube.
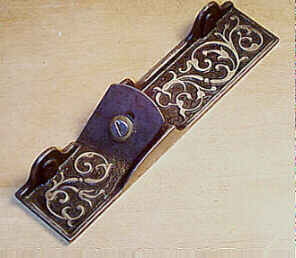
#40 Scrub plane, 9 1/2"L, 1 1/4"W, 2 1/8lbs, 1896-1962.
This is Stanley's version of a scrub plane, designed to remove a lot of wood quickly. It has a very thick blade (without a cap iron) which is ground convex, and a very wide mouth, all of which make the act of removing large amounts of stock, sometimes called "hogging", happen easily.
 The plane
has a
knob and a tote, both made of beech. The tote looks like the
common beech tote
used on the transitional planes, but the knob is shaped
differently - it's much
taller, and resembles the rosewood hi-knob version used on
the metallic bench
planes. The earliest knob is rather shapely, and has a fast
taper to its
diameter where it meets the casting.
The plane
has a
knob and a tote, both made of beech. The tote looks like the
common beech tote
used on the transitional planes, but the knob is shaped
differently - it's much
taller, and resembles the rosewood hi-knob version used on
the metallic bench
planes. The earliest knob is rather shapely, and has a fast
taper to its
diameter where it meets the casting.
There are some examples of this tool with rosewood
knobs and totes, but they
are later models and seem to be scarcer than those equipped
with beech. The
switch from beech to rosewood may have had something to do
with Stanley finally
dropping the beech transitional planes during WWII; they no
longer needed to
buy beech, and were content just destroying the rainforests.
The finish on the
rosewood is very thick, and it often obliterates the wood's
grain. The WWII
years used the common dark-finished hardwood knob and tote
that was used on the
bench planes.
There are two basic castings used for these planes.
The earlier of the two
has a narrow cross-rib cast between the two arched sides of
the tool. It's on
this cross-rib that the iron seats, lending support when the
lever cap is
tightened. Because of the plane's design, the lever cap
screw sits above the cross-rib,
and can make the iron flex a bit when clamped in place.
Stanley redesigned the
iron's seat, making it T-shaped so that the lever cap screw
sits directly over
the casting, which acts as a buttress.
Check that the lever cap screw can tighten the blade
- sometimes the screw
can bottom out before applying enough pressure on the blade.
Also check that
the lever cap itself hasn't been snapped in two, and then
repaired.
The plane's main casting is entirely japanned, except
for the sole. Scrub
planing wood can be hard work, which often generates
rivulets of sweat dripping
down your forearms onto the plane. Sweat and bare metal
don't make a happy
couple, so Stanley may have japanned their exteriors to keep
the plane spiffy
looking as long as possible. Most examples of the plane,
however, exhibit a
ghastly appearance from years of toil.
These planes are hard to ruin physically since
they're quite ruggedly built
to handle the job for which they are designed. If you're at
all into preparing
rough stock, this is one plane to own. Even the most
die-hard power tool junkie
can successfully use this plane, but be careful if you fall
into that gene pool
- it might just be your baptism into the spiritual world of
handtool
fundamentalism.
#40 1/2 Scrub plane, 10 1/2"L, 1 1/2"W, 2 1/2lbs, 1902-1948.
Same as the #40, only a bit larger, and much less encountered. Check that the lever cap's width is equal to the iron's to ensure that it isn't a replacement from the narrower #40.
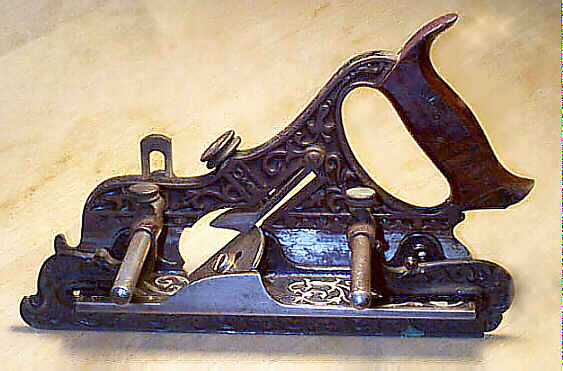
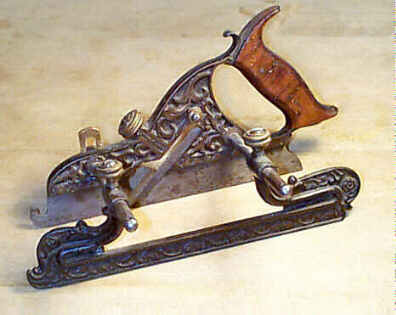
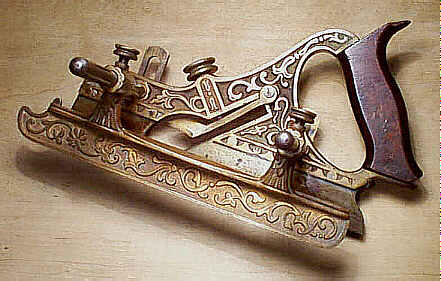
#41 Miller's Patent Adjustable Metallic Plow, Filletster, Rabbet, and Matching Plane, 9 7/8"L, various widths, 4lbs, 1871-1895. *
 This is the
first in a series of combination planes that Stanley
introduced in an attempt
to counter the wooden plane equivalent that had become the
standard for this
type of work. Its primary function is as a plough plane.
This plane is
beatifully cast with floral scrollwork on its body, fences,
and fillister
bottom and is a fine example of Victorian extravagance that
permeated design
and form no matter the object. This was a calculated act on
Stanley's part, due
to the competition with the wooden ploughs that were often
the showpiece of the
master cabinetmaker - wooden ploughs at this time were often
made of an exotic
wood, most often boxwood and/or rosewood, and were sometimes
decorated with
ivory trimmings. Had Stanley introduced this plane as just a
chunk of metal,
which they easily could have, it likely would have suffered
a different fate -
surely no workman was going to turn in his fancy wooden
plough for some
unsightly chunk of metal. Many of them did bite on the bait,
transforming wood
into metal, and Stanley sold a considerable number of these
planes.
This is the
first in a series of combination planes that Stanley
introduced in an attempt
to counter the wooden plane equivalent that had become the
standard for this
type of work. Its primary function is as a plough plane.
This plane is
beatifully cast with floral scrollwork on its body, fences,
and fillister
bottom and is a fine example of Victorian extravagance that
permeated design
and form no matter the object. This was a calculated act on
Stanley's part, due
to the competition with the wooden ploughs that were often
the showpiece of the
master cabinetmaker - wooden ploughs at this time were often
made of an exotic
wood, most often boxwood and/or rosewood, and were sometimes
decorated with
ivory trimmings. Had Stanley introduced this plane as just a
chunk of metal,
which they easily could have, it likely would have suffered
a different fate -
surely no workman was going to turn in his fancy wooden
plough for some
unsightly chunk of metal. Many of them did bite on the bait,
transforming wood
into metal, and Stanley sold a considerable number of these
planes.
The plane has a nicely finished rosewood tote, which
is stamped with
Miller's patent date on its left side. The tips/horns of
these totes are often
broken since they extend back a great deal with little to
support them other
than the wood's grain (later models of the plane overcame
this defect simply by
making the tote with smaller horns). The totes are fastened
to the cast frame
with pins. The earliest models use two pins to fasten the
tote to the frame,
whereas the later ones use only a single pin. Frequently,
the totes are cracked
in two around the pins or have tote chunks missing about the
pins.
 The
earliest
models, often called "humpbacks", have a pronounced hump
starting
just behind the screw that activates the brass lever cap
(doubles as a chip
deflector) to secure the iron in place. The hump terminates
with a graceful,
looping, and hook-like return at the top of the tote. The
later models have
more of an S-shape from the screw to the tote. There are
also other ways to
date these planes, such as the type of screws used on them
(brass surrounding a
slotted round-headed screw vs. all brass screw vs. slotted
brass screw), the
fence style (two fences vs. one fence with two sets of
holes), the chip
deflector (stubby and angular vs. larger and curvilinear),
the endpoints of the
arms (turned acorn-like finials vs. simple rounding), and
the slitting cutter
(absent or present). Whatever the vintage of the plane, they
all have the
elaborate castings, but the earliest ones fetch the most
moolah from
collectors.
The
earliest
models, often called "humpbacks", have a pronounced hump
starting
just behind the screw that activates the brass lever cap
(doubles as a chip
deflector) to secure the iron in place. The hump terminates
with a graceful,
looping, and hook-like return at the top of the tote. The
later models have
more of an S-shape from the screw to the tote. There are
also other ways to
date these planes, such as the type of screws used on them
(brass surrounding a
slotted round-headed screw vs. all brass screw vs. slotted
brass screw), the
fence style (two fences vs. one fence with two sets of
holes), the chip
deflector (stubby and angular vs. larger and curvilinear),
the endpoints of the
arms (turned acorn-like finials vs. simple rounding), and
the slitting cutter
(absent or present). Whatever the vintage of the plane, they
all have the
elaborate castings, but the earliest ones fetch the most
moolah from
collectors.
The plane came with the following irons - 8 plough
irons, 1/8",
3/16", 1/4", 5/16", 3/8", 7/16", 1/2", and
5/8", a 1/4" tonguing iron, and a 1 5/8" fillister iron. The
irons are very thick with a v-groove on their backsides into
which the skate
fits to grip and align them. These irons are very much like
the typical wooden
plough irons, but not nearly as long.
 Starting in 1884, a
slitting cutter was added, which was used to slice thin
sections of wood, a
task commonly done skillfully by using a handsaw. This
slitting cutter has a
separate pressed steel depth stop that fits over it. The two
of them fit over
the rear arm, on the right side of the plane. A large brass
nut, exactly like
the one used for the depth stop, holds them in place by
screwing onto the
threads of the arm. The slitting cutter is held in place
laterally by a
machined recess in the plane's main casting. The slitting
cutter and/or its
depth stop are often missing from these planes. For a very
brief time, a second
brass depth stop, like that used on all models of the
series, was supplied as
the depth stop for the slitting cutter.
Starting in 1884, a
slitting cutter was added, which was used to slice thin
sections of wood, a
task commonly done skillfully by using a handsaw. This
slitting cutter has a
separate pressed steel depth stop that fits over it. The two
of them fit over
the rear arm, on the right side of the plane. A large brass
nut, exactly like
the one used for the depth stop, holds them in place by
screwing onto the
threads of the arm. The slitting cutter is held in place
laterally by a
machined recess in the plane's main casting. The slitting
cutter and/or its
depth stop are often missing from these planes. For a very
brief time, a second
brass depth stop, like that used on all models of the
series, was supplied as
the depth stop for the slitting cutter.
Stanley, in its advertising literature about the
planes, gave unique names
to the fences that came with the planes. They called the
ornately cast
fillister fence the "gate", and the shorter fence the
"gauge", which was an optional feature for this and the #42 planes. In deference
to modern vocabulary, fillister fence and ploughing fence
are used in the
descriptions that follow.
Since there are many subtle changes to the castings
during the plane's
production, one has to be careful about buying one for parts
to complete one
that is missing some. One of the more common problems with
this plane is its
delicately cast fillister fence, which can easily break if
the plane is
mistreated. This fence rides on two arms that are screwed
into the plane's
body. Usually, the distance the arms are apart from each
other varies ever so
slightly, which can make for a tough time to find a suitable
fence replacement;
the fence will fit onto the arms, but it can bind as it is
slid closer to the
body due to the misalignment of the fences holes and the
position in the main
casting where the arms are tapped.
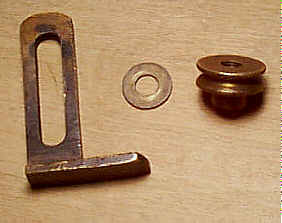
The chip deflector, which doubles as the bearing part
to secure the iron, is
made of brass and can break or bend along its length. It is
secured to the
plane with two screws. Many examples are missing a screw or
have replacements.
The earliest models used round-headed screws to attach the
chip deflector, with
the later ones using flat-headed screws. The depth gauge is
made of brass, and
it can sometimes get banged up making it difficult to slide
along its entire
length. The depth gauge slips over the the right portion of
the forward arm,
and a brass knurled nut, like that used with the slitting
cutter, is screwed onto
the arm to lock the gauge in position. A brass washer is
proper to the depth
stop and nut.
 The
fillister
bottom screws to the skate of the plane - there are two
slots in the skate, one
before the cutter and one behind the cutter, with each slot
accepting its
corresponding screw. Check that the screws aren't
replacements. They should
have flat heads, and fit snuggly into the slots provided
them. The fillister
beds are not interchangeable between the earlier and the
later models; the
position of the screws is just slightly different to allow
proper alignment of
the bed to the plane. The fillister bottom carries the wide
fillister iron,
which is set at a skew to the fillister bottom. A large
slotted screw and a
brass washer hold it in place. A spur is provided on the
bottom, forward of the
cutter, to score the wood's grain before the iron cuts it.
This spur is
dovetailed in place, and often is frozen in place. Many
planes are missing the
fillister bottom altogether. If it is, and you're seeking a
replacement, the
line forms at the rear.
The
fillister
bottom screws to the skate of the plane - there are two
slots in the skate, one
before the cutter and one behind the cutter, with each slot
accepting its
corresponding screw. Check that the screws aren't
replacements. They should
have flat heads, and fit snuggly into the slots provided
them. The fillister
beds are not interchangeable between the earlier and the
later models; the
position of the screws is just slightly different to allow
proper alignment of
the bed to the plane. The fillister bottom carries the wide
fillister iron,
which is set at a skew to the fillister bottom. A large
slotted screw and a
brass washer hold it in place. A spur is provided on the
bottom, forward of the
cutter, to score the wood's grain before the iron cuts it.
This spur is
dovetailed in place, and often is frozen in place. Many
planes are missing the
fillister bottom altogether. If it is, and you're seeking a
replacement, the
line forms at the rear.
The background of the castings is japanned, and the
high points are machined
flat, which combine to give the plane a striking appearance.
There is no number
cast into the plane, but the skate, which is fashioned from
steel and is pinned
to the main casting, usually has the imprint of Stanley Rule
and Level Co.
stamped into the right rear of it. While looking for the
company's logo, check
that the casting, where it meets the rosewood handle, above
and below, isn't
cracked or repaired.
Enough examples of the plane can be found equipped
with the two fences,
which offers ample proof that many woodworkers of the day
had some money
burning a hole in their pockets in order to incur the
additional expense of the
optional ploughing fence. The fillister fence is used along
with the fillister
bottom, but can be used without the fillister bottom during
normal ploughing
operations. The fillister fence has two looping areas that
extend beyond the
positions of the two arms so that it can fit over the
fillister bottom and
regulate the width of cut. The fence's length is a bit
longer than the plane's
skate. This is the fence that can be damamged easily. The
other fence is
shorter, a bit shorter than the plane's skate, and is used
for general
ploughing. Both fences have floral patterns cast into them,
but the fillister
fence is more ornate.
During the mid-1880's, the two fence version was
dropped for a model that
carried only one. The plane itself remained relatively
unchanged (other than
the addition of the slitting cutter), with the fence
undergoing a redesign. The
new fence has 2 sets of holes to receive the plane's arms,
with one set
directly over the other. The fence curves toward the plane's
skate, so the
top-most set of holes is used with the fillister bottom, and
the bottom-most
for normal ploughing. This fence is always iron (an
important distinction for
the plane that follows).
#42 Miller's Patent Adjustable Metallic Plow, Filletster, Rabbet, and Matching Plane, 1871-1892. *
 This plane is
identical to the #41,
except that it is made from gun metal, an alloy of copper
(88% copper, 10% tin,
and 2% nickel), similar in appearance to bronze. Since
this plane isn't made of
iron, like the #41, it is somewhat malleable. Dropping it on a hard
floor won't
necessarily break it, like an iron one is apt to suffer.
Instead, the metal
will bend a bit before it breaks, so check for ones that
have been mistreated
by sighting down its skate - it should be perfectly
straight.
This plane is
identical to the #41,
except that it is made from gun metal, an alloy of copper
(88% copper, 10% tin,
and 2% nickel), similar in appearance to bronze. Since
this plane isn't made of
iron, like the #41, it is somewhat malleable. Dropping it on a hard
floor won't
necessarily break it, like an iron one is apt to suffer.
Instead, the metal
will bend a bit before it breaks, so check for ones that
have been mistreated
by sighting down its skate - it should be perfectly
straight.
This plane, like the #41, can accept the same two fences as those that fit
the #41. However, the
fillister fence is cast of gun metal, and the ploughing
fence is cast from
iron. Never accept one that has two iron fences. As is the
case with the #41, the plane is most
often found with a single fence, and a missing fillister
bottom (it's also
fashioned from iron for this plane). There are
reproductions fences out there,
and they are rather easy to spot. They don't have the
detail that the original
does; the fine pebbled background on the portions that
loop up to meet the
holes for the arms is washed out and nearly smooth.
The earliest models have their background japanned
which gives the tool a
striking appearance with the machined, unpainted high spots.
Even the most
powertool hungry wood processer would find this plane a joy
to own. The humback
models do not have the pronounced hook above the top of the
handle, but it does
have a slight hook that sets it apart from the later
castings.
#43 Miller's Patent Adjustable Metallic Plow and Matching Plane, 1871-1895. *
 The same basic
design as the #41
except that the plane doesn't have the fillister bed and
cutter. Therefore,
there is only one fence provided on the plane. The easiest
way to distinguish
this plane from the #41 is to look for the two screw
holes in the skate;
this model doesn't have them.
The same basic
design as the #41
except that the plane doesn't have the fillister bed and
cutter. Therefore,
there is only one fence provided on the plane. The easiest
way to distinguish
this plane from the #41 is to look for the two screw
holes in the skate;
this model doesn't have them.
The earliest models of this plane, the ones of the
humpback casting,
provided the fillister fence, with some slight modification,
as the standard
ploughing fence. Since the fillister fence has looping ends
to fit over the
fillister bed, which isn't supplied with this model, they
are filled in with
iron to give it a bit more strength. They were cast this
way, not modified
after the fact. Stanley introduced the familiar and shorter
ploughing fence
when the humpback casting was dropped for the later style
plane.
These planes aren't as common as the #41, but because they don't have
all the bells and
whistles as the #41, namely the fillister bed and fence, they don't
command as much money
as the #41
does.
#44 Miller's Patent Adjustable Metallic Plow
and Matching
Plane, 1871-1892. *
 Same as the #42 except it is made
from gunmetal. The ploughing fence is cast from gunmetal
as well. This fence is
damn tough to replace if you need one. This is the rarest
of the four models of
Miller's ploughs.
Same as the #42 except it is made
from gunmetal. The ploughing fence is cast from gunmetal
as well. This fence is
damn tough to replace if you need one. This is the rarest
of the four models of
Miller's ploughs.
I can't say whether the filled-in fillister fence was
supplied as the
ploughing fence with this plane on the humpback models. I
suspect it was, but
that's not certain since this plane is rare enough as it is,
and the early
humpback models of any of these planes are rarer still. I've
yet to see an
example surface in a collection or show up for sale (public
or private).
[ START ] |
[ PREV ] | [ NEXT
] | [ END ]
[ HOME
]
Copyright
(c) 1998-2012 by Patrick A. Leach. All Rights Reserved.
No part may be
reproduced by any means without the express written
permission of the author.